 Agentic Fabriq
Virtualization Overview
This document explains what Agentic Fabriq virtualization is for and how to use it from the dashboard.
What It Does
Virtualization gives users an isolated local workspace for supported coding agents and OpenClaw. From the dashboard, users can prepare a base image, create a VM, start or stop it, and copy the connection commands they need.
These VMs are meant for agent development workflows. They are not general-purpose desktop VMs.
Architecture
The dashboard coordinates with a local VM manager running on the user's Mac. Agentic Fabriq provides the authenticated path between the dashboard and that local manager, while the VM files and QEMU processes stay on the user's machine.
Dashboard -> Agentic Fabriq -> local VM manager -> local VMs
The user starts the local manager with afctl vm serve. Once connected, the dashboard can show VM status and send VM actions without exposing local VM internals directly to the web app.
Host Requirements
The current provider is macOS-focused and targets Apple Silicon QEMU guests:
- macOS host.
- QEMU with
qemu-imgandqemu-system-aarch64. - UEFI firmware files under a Homebrew prefix such as
/opt/homebrew/share/qemu. - Node.js and npm for the local VM server dependencies.
- An authenticated
afctlinstallation.
Install QEMU with:
brew install qemu
If QEMU is installed somewhere non-standard, the VM server can use explicit paths:
AF_QEMU_IMG=/path/to/qemu-img AF_QEMU_SYSTEM=/path/to/qemu-system-aarch64 afctl vm serve
How To Use It
1. Install QEMU
On macOS, install QEMU before creating a VM:
brew install qemu
The dashboard checks QEMU readiness after the VM manager connects. If QEMU or firmware is missing, fix that first.
2. Start the local VM manager
Authenticate the host CLI, then start the VM manager:
afctl auth login
afctl vm serve
Useful expected output includes:
Auth token found - relay connection will be enabled.
AF VM server listening on http://localhost:7865
[relay] Authenticated - dashboard integration active
Keep this terminal process running while you use the dashboard. If the dashboard says the VM manager is disconnected, run these commands again from the Mac that will host the VMs.
3. Open the Virtual Machines page
Open the dashboard and go to /virtualization.
The page should show Local connected near the title. It also shows the setup instructions, QEMU readiness, available images, and any existing VMs.
4. Prepare an image
In the Images section, download the Ubuntu image before creating a VM. The current image is:
ubuntu-24.04-arm64
The download can take a few minutes. When the image status changes to Ready, VM creation is available.
5. Create a VM
Click Add VM and fill out the form:
- Choose an agent type: Claude Code, Cursor, Codex, or OpenClaw.
- Choose the ready Ubuntu image.
- Name the VM.
- Add any host folders the agent should be able to see.
- Choose memory and CPU size.
- Create the VM.
Shared folders are mounted inside the VM as:
/mnt/share0
/mnt/share1
Only the folders you explicitly add are visible inside the VM.
6. Start the VM and wait for provisioning
Start the VM from its card. The status moves through:
stopped -> starting -> provisioning -> running
First boot can take several minutes. QEMU starts first, then cloud-init installs packages and agent tooling. Wait until the card shows Running.
7. Connect and authenticate inside the VM
When the VM is running, copy the SSH command from the VM card and paste it into your terminal. For Cursor, use the Remote-SSH instructions shown in the dashboard.
Inside the VM, authenticate the guest CLI:
afctl auth login --remote
After that, start the selected coding agent in the SSH session. Agentic Fabriq tools are available through the guest configuration.
Screenshot Walkthrough
The guide references screenshots under /images/virtualization/ so the flow can be shown in order.
1. Run the local VM manager
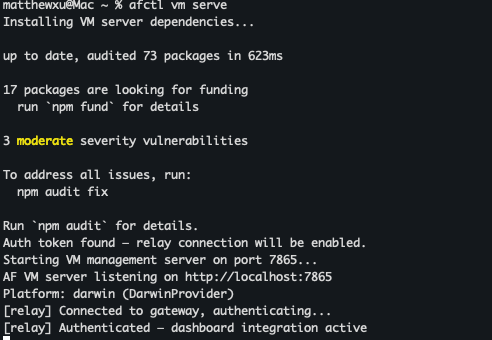
afctl vm serve installs the VM server dependencies if needed, starts the local VM management server on port 7865, and authenticates the relay so dashboard integration becomes active.
2. Open the connected virtualization dashboard
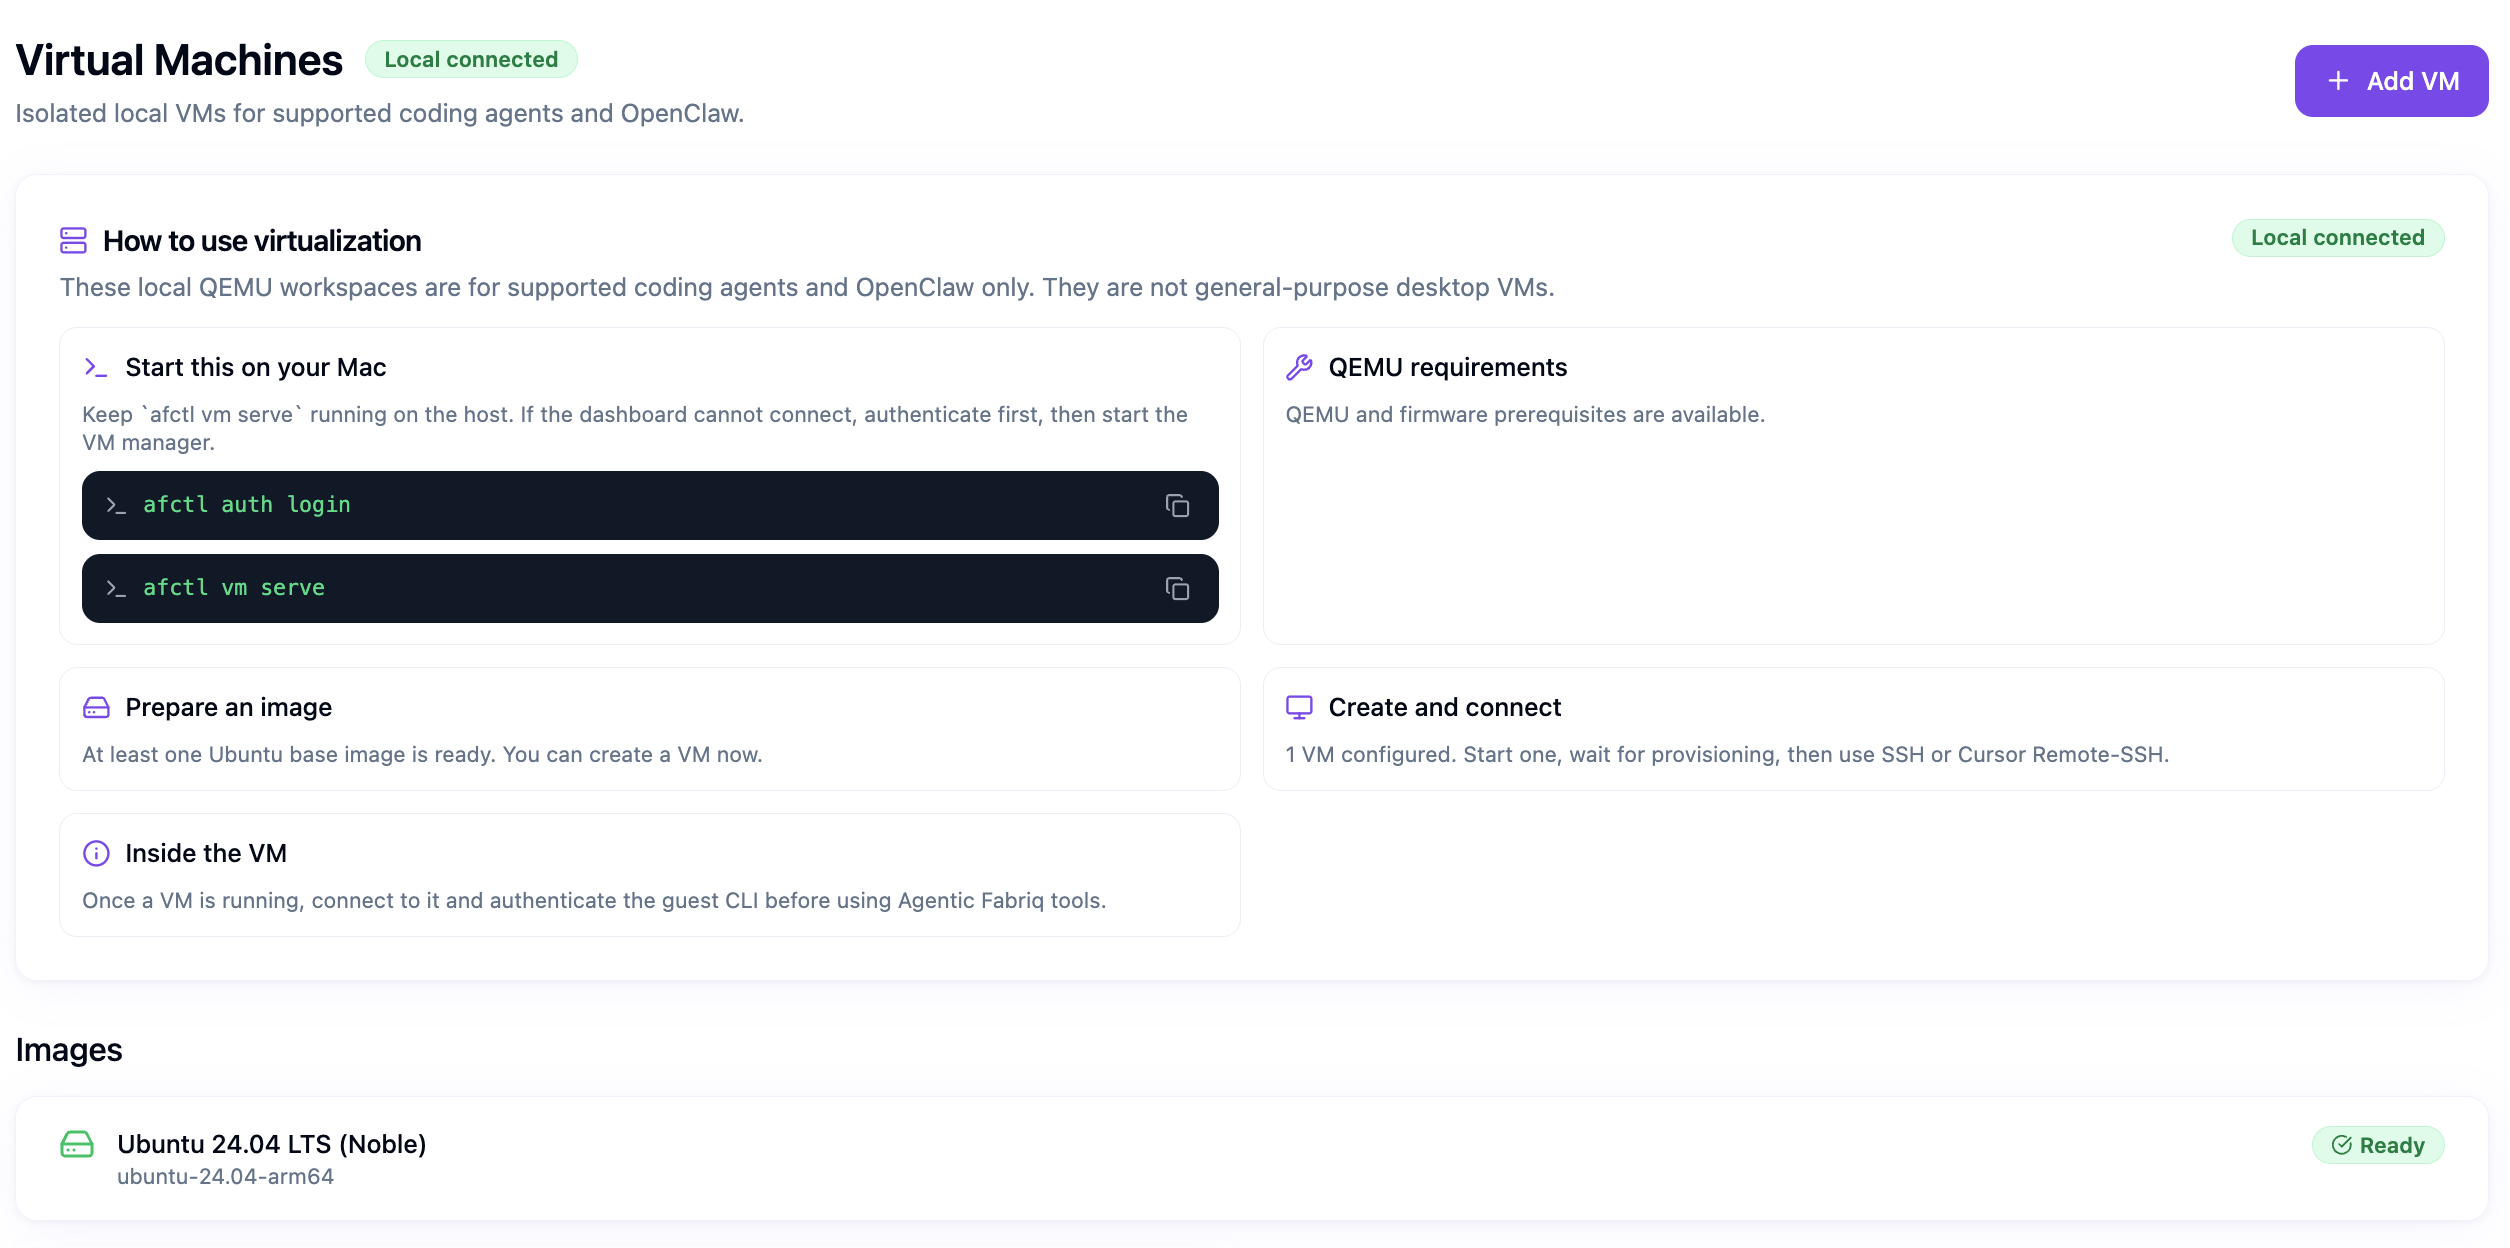
The page shows the Add VM button, the local connected state, the usage instructions, QEMU readiness, and the Images section. The Images section lists the base images that can be used to create VMs.
3. Create a VM
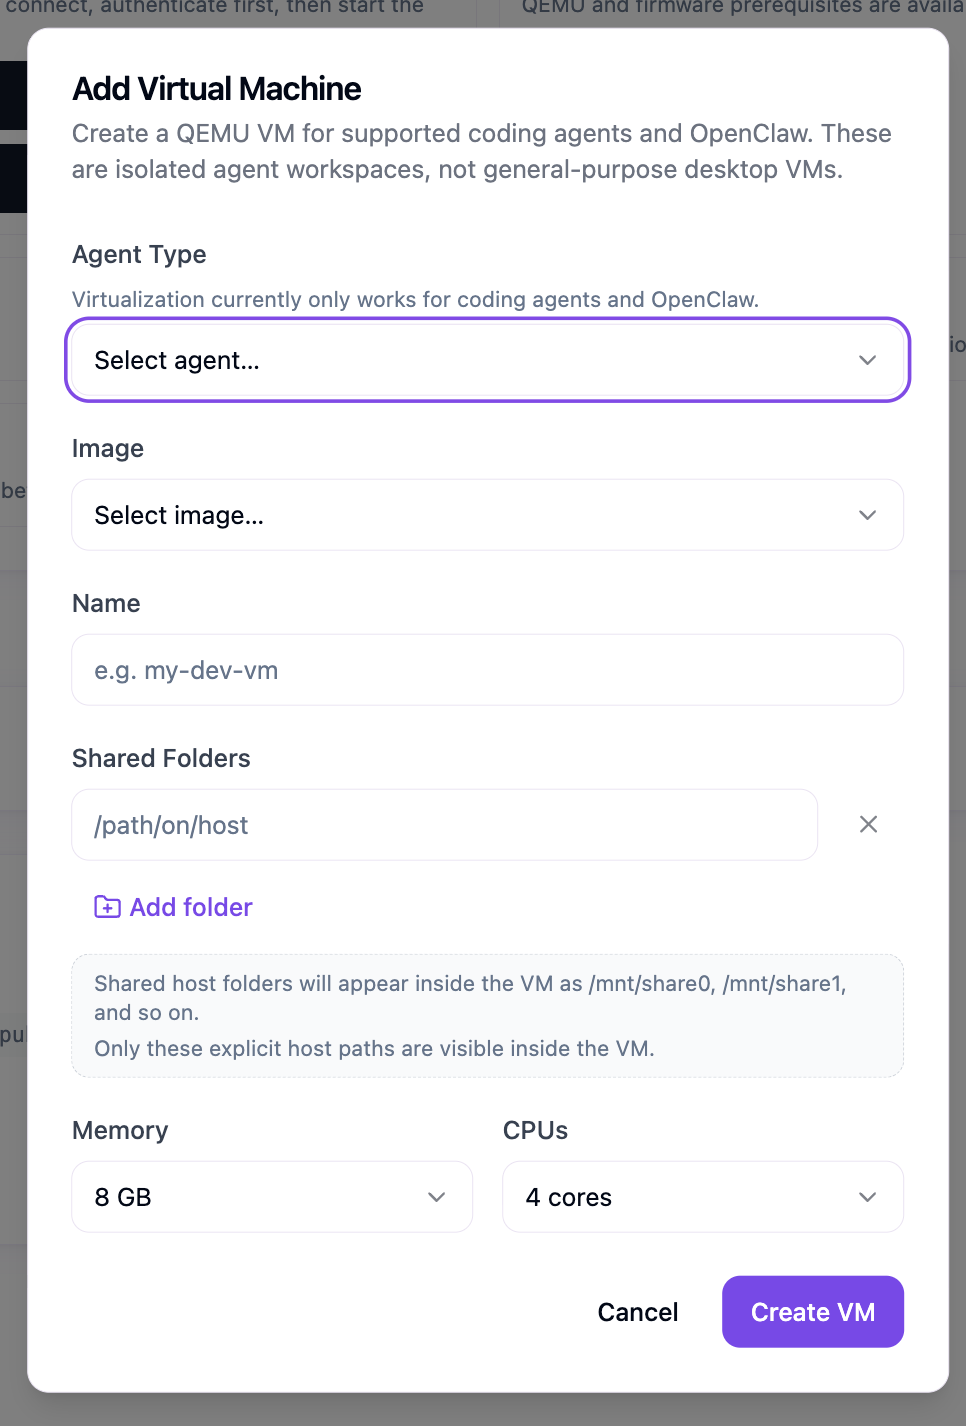
The Add Virtual Machine modal shows every creation category: agent type, image, VM name, shared folders, memory, and CPU count. It also explains that these VMs are for supported coding agents and OpenClaw, and that shared host folders appear inside the guest as /mnt/share0, /mnt/share1, and so on.
4. Review a stopped VM
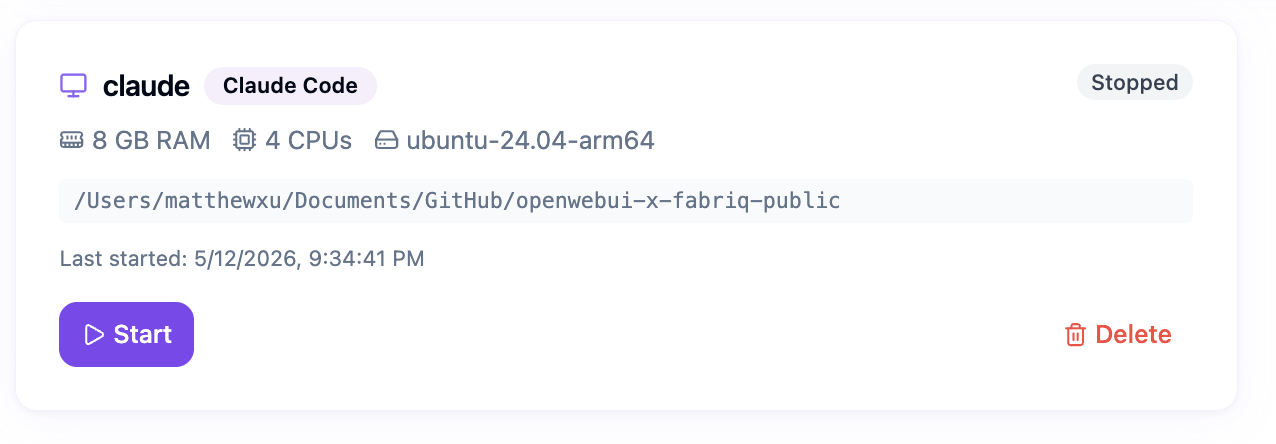
A stopped VM card shows the selected agent, memory, CPU count, image, shared folder path, last start time, and the Start and Delete actions.
5. Connect to a running VM
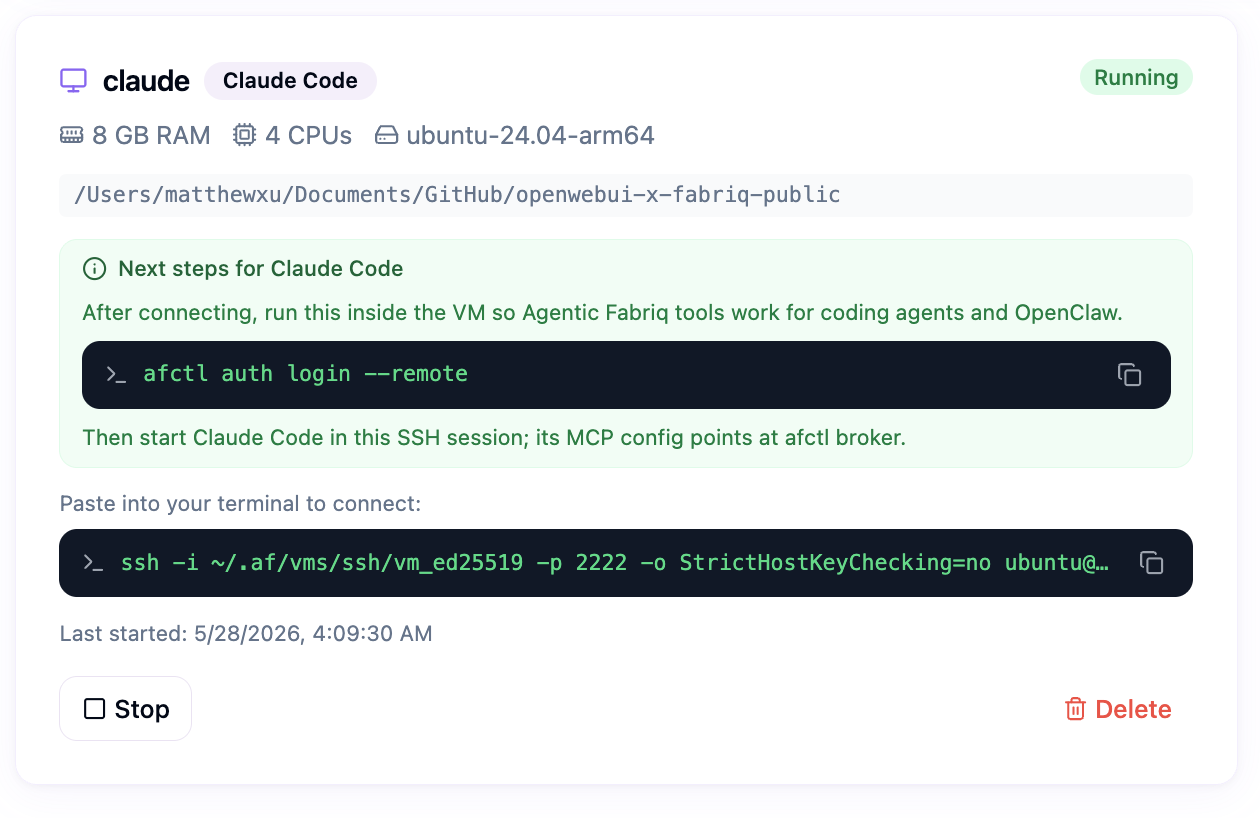
When the VM is running, the card shows the SSH command to paste into a terminal and the next in-guest command, afctl auth login --remote, so Agentic Fabriq tools work for coding agents and OpenClaw.
6. Wait for provisioning
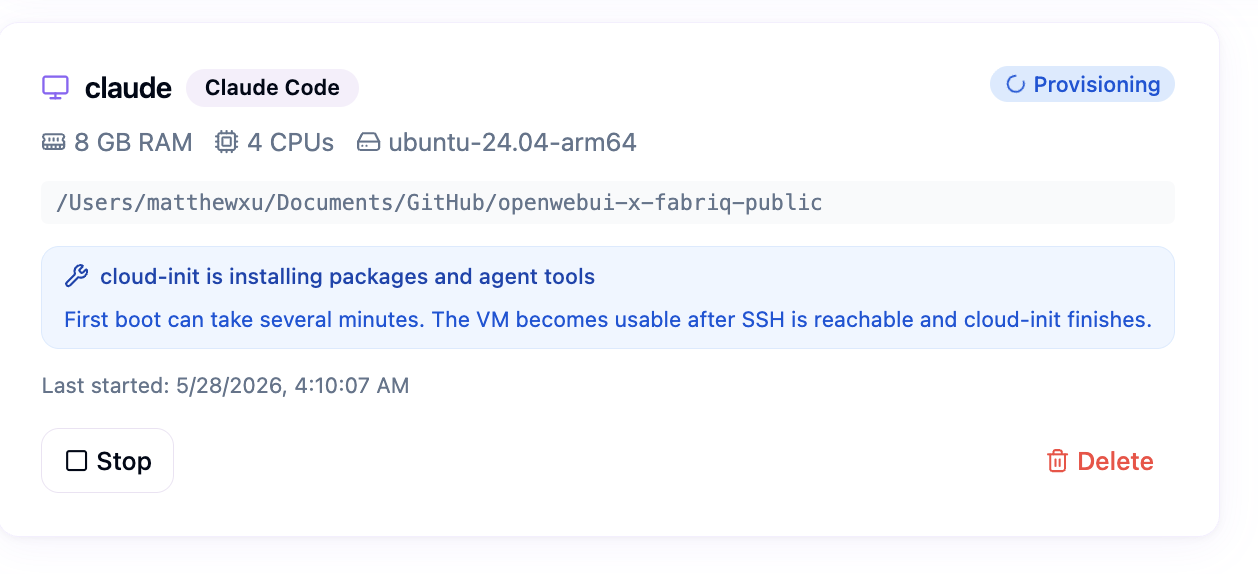
Provisioning has two phases: QEMU starts the VM first, then cloud-init installs packages and agent tools. First boot can take several minutes; the VM becomes usable after SSH is reachable and cloud-init finishes.
VM Storage And State
VM data lives under the host user's ~/.af/vms directory:
~/.af/vms/vms.json
~/.af/vms/images/
~/.af/vms/instances/<vm-id>/
~/.af/vms/ssh/vm_ed25519
~/.af/vms/ssh/vm_ed25519.pub
Each VM instance has its own directory, QCOW2 overlay disk, EFI vars file, cloud-init seed image, and console log.
VM state is persisted in vms.json. When the VM server starts, it reconciles stale VM records by checking whether recorded QEMU PIDs are still alive.
Images
The image catalog is currently hard-coded in images.js.
The current image entry is Ubuntu 24.04 LTS ARM64:
id: ubuntu-24.04-arm64
arch: aarch64
resizeTo: 20G
defaultMemoryGB: 8
defaultCpuCount: 4
The download pipeline:
- Verifies
qemu-img. - Downloads the remote cloud image.
- Tracks in-memory download progress.
- Resizes the image to
20G. - Marks it as
ready.
If the download fails, partial files are removed and the image status becomes error.
VM Creation
Creating a VM:
- Allocates an SSH port starting at
2222. - Creates an instance directory.
- Creates a QCOW2 overlay disk backed by the downloaded base image.
- Copies the EFI vars template.
- Generates cloud-init
user-dataandmeta-data. - Creates a seed image.
- Persists the VM record with status
stopped.
Shared folders are stored as objects like:
{
"hostPath": "/Users/me/project",
"guestTag": "share0"
}
The macOS provider exposes shared folders with QEMU -virtfs. Inside the guest, cloud-init mounts them under:
/mnt/share0
/mnt/share1
Only explicitly shared folders are visible inside the VM.
VM Startup And Provisioning
Starting a VM launches QEMU detached from the local VM server. QEMU receives:
- Apple Silicon VM base args with HVF acceleration.
- UEFI pflash drives.
- The VM's QCOW2 disk.
- The cloud-init seed drive.
- User-mode networking.
- SSH host forwarding.
- Any extra port forwards configured on the VM.
- Any shared folder
-virtfsargs. - Serial output redirected to the instance
console.log.
After QEMU starts, the local VM server marks the VM as starting.
In the background, the server polls for SSH reachability. When SSH becomes reachable, it marks the VM as provisioning. It then polls cloud-init status until provisioning completes and marks the VM as running.
VM Shutdown And Delete
Stopping a VM first tries a graceful guest shutdown:
sudo poweroff
If the process does not exit, the platform provider escalates from SIGTERM to SIGKILL.
Deleting a VM stops it if needed, removes its instance directory, and removes its record from vms.json.
Agent Setup Inside The Guest
Cloud-init creates an ubuntu user, installs common packages, and installs the Agentic Fabriq SDK into:
/home/ubuntu/.af-venv
It also configures shell PATH entries for:
/home/ubuntu/.npm-global/bin
/home/ubuntu/.local/bin
/home/ubuntu/.af-venv/bin
Agent-specific behavior:
- Claude Code installs Node.js, npm, and
@anthropic-ai/claude-code. - Codex installs Node.js, npm, and
@openai/codex. - Cursor installs base packages and writes Cursor MCP config.
- OpenClaw currently gets the base package set.
The guest configures MCP files for Claude and Cursor to run afctl broker.
Dashboard UI Behavior
The /virtualization page:
- Polls
/api/v1/vm/statusevery 3 seconds throughConnectionGuard. - Shows a disconnected state with visible setup instructions,
afctl auth login, andafctl vm serveif the VM server is unavailable. - Fetches VMs, agents, and images.
- Polls VMs and images every 3 seconds.
- Lets users download images.
- Lets users create VMs only after at least one image is ready.
- Shows VM cards with resource info, shared folders, status, start/stop/delete actions, and connection instructions.
The main dashboard also includes a virtualization summary card that checks /api/v1/vm/status, fetches /api/v1/vm/vms, and links to /virtualization.
Dashboard Signposting
The dashboard should keep the correct sequence visible without turning it into a checklist. The current UI uses direct instruction panels, disabled actions, copyable commands, and VM status cards.
For host auth and VM manager connection:
- If
/api/v1/vm/statusreturns401, tell the user to sign in to the dashboard, then runafctl auth loginandafctl vm serve. - If it returns
503, tell the user to start the host relay from the same account withafctl auth login, thenafctl vm serve. - If it times out, tell the user the VM manager is not reachable, explain that the VM manager runs on their Mac, and show copyable
afctl auth loginandafctl vm servecommands. - State that virtualization only works for supported coding agents and OpenClaw, not general-purpose desktop VMs.
For QEMU readiness:
- Call
/api/v1/vm/prerequisites. - Surface missing
qemu-img,qemu-system-aarch64, or firmware errors. - Provide the exact
brew install qemucommand. - If env overrides are needed, show the
AF_QEMU_IMGandAF_QEMU_SYSTEMexample.
For image readiness:
- Make
Download Ubuntu imagethe primary CTA until an image hasstatus: ready. - Disable or de-emphasize
Add VMuntil an image is ready. - Show download progress and current operation: checking, downloading, resizing, ready, or error.
For shared folders:
- In the Add VM dialog, preview each mapping live:
/Users/me/project -> /mnt/share0
- Warn that only these explicit paths are visible inside the VM.
- Consider validating empty or obviously invalid host paths before submit.
For provisioning:
- When status is
starting, say that QEMU is booting and SSH is not reachable yet. - When status is
provisioning, say that cloud-init is installing packages and agent tools. - Mention that first boot can take several minutes.
- If the VM stays in
startingorprovisioningfor a long time, show the console log path:
~/.af/vms/instances/<vm-id>/console.log
For post-start steps:
- When the VM reaches
running, show an agent-specific next-step panel. - Tell the user to SSH into the VM.
- Tell them to run:
afctl auth login --remote
- Then tell them how to start or connect the selected agent.
- For Cursor, keep the Remote-SSH instructions visible.
- For Claude Code and Codex, show the shell command or expected launcher flow once confirmed by the installed agent tooling.
Need help?
Our team is here to help you get started.